RBA Tech: How To Install Your First Tubular Tire
To discover the speed, phenomenally light weight, ease of acceleration and cornering sensitivity that one can only achieve from tubular tires, you will have to search out a true pro-level bicycle shop that understands the concept and will happily mount tubular tires-or learn how to install them at home yourself. Don’t mistake a poseur store that specializes in selling expensive bicycles for a pro shop. Ask if anyone on the staff rides tubulars. If not, get ready to bolt. Poseur pro stores will most certainly attempt to talk you out of tubulars and offer a ‘just-as-good-as-tubular’ clincher wheelset. Sorry, there is no such thing.
Do-it-yourself home tubular kit
Understanding the tubular concept is important-because you’ll need to be able to trust your wheels around high-speed corners, and because there are certain protocols that apply to tubular tires and wheels that have no relation to clinchers. The best way to learn about tubulars is to install your first set of tires at home. Here’s a list of what you’ll need:
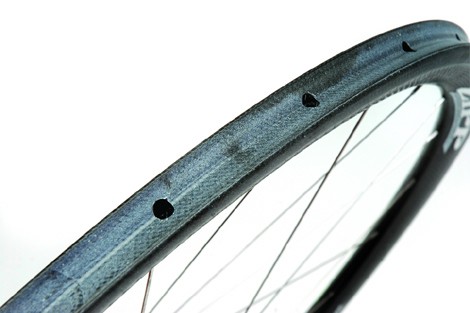
- Tubular wheels: the rims have no flanges. Instead, the tire interface is a concave depression on the top surface of the rim where the tire is glued to the wheel.
- Tubular tires: The least expensive, good quality tubulars, like the Continental Giro and Vittoria Rally, are a steal at 28 bucks per tire. The upper echelon of the tubular price range, the silk-casing Andre Dugast Strada CX, cost $170 each. It goes without saying that the better tires cost more, but buy what you can afford and choose a larger-volume casing (22 to 25 millimeter) for the fastest rolling and most comfortable ride. Small-diameter, ultra-high-pressure types should be limited to time-trial events. Remember, you will need at least three tubulars: a pair to ride and one as a spare should you puncture.
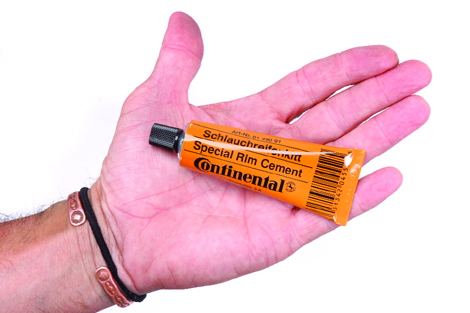
- Quality tubular glue: Avoid the old-school red stuff and go for a modern clear-type tubular glue like Continental or Schwalbe sells. DO NOT substitute industrial contact adhesives like 3M Fast-Tack, as you will be relying on the glue to remain on both the tire and rim surface, as well as to stay tacky for potential wheel changes should you flat.
- Flux brushes: the small, steel-handle brushes that are sold in the plumbing section of hardware stores (get a handful).
- A metal or glass container with an airtight lid.
- Clean, white cotton shop towels (colored ones will make your wheels look funny).
- Industrial-strength thinner like MEK or lacquer thinner.
- A wheel-building stand (or an upside-down bike secured in a bike stand) to hold your wheels while you adjust your tires.
- A dry, very clean work table that you can drip glue onto while you work.
- Patience to let the adhesives do their work before you ride.
Use a made-for-tubular glue. If you substitute adhesives, you might not survive the
testing process.
The night before
You don’t have to do this step, but it helps. Install your new tubulars on an old set of wheels and inflate to within ten psi of their maximum rated pressure. This will keep them stretched until you need to begin the installation process.
Why won’t my tubulars fit the rims?
Because of the curved rim interface, tubulars do not need to fit as precisely as clincher tires. Some can be mounted with a little force, others (often the same maker and model) require stretching. Try a trial mount before you stretch a tire.

Stretching the tubular is sometimes necessary, but be cautious.
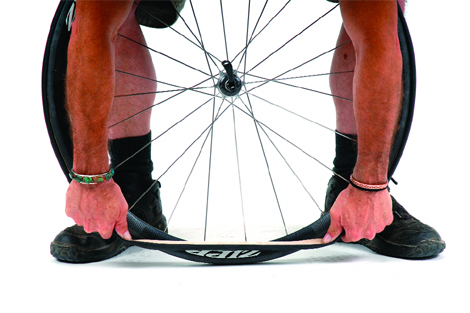
It’s possible to delaminate the base tape by over-stretching-which will ruin it-game over, money wasted. Stretch the tire by putting the valve to the side, and looping the tire under your foot and anchoring it over the arch of your hip. Push firmly with your foot until the tire just begins to feel like an ultra firm rubber band. Do another trial fit before you stretch it again.
The trial fit
Install a tubular by placing the deflated tire in the rim’s valve hole and, with the valve at the top, place the wheel upright between your feet and securely pressed against a hard, clean floor. Now, grip the tire on each side of the valve and stretch it while pushing downward, slipping the tire onto the rim as you go. When you reach the bottom of the rim, capture the tire with your thumbs, flip the wheel upright and force the tire onto the rim by working towards the center with alternating thumbs. If you don’t make it around the first time, try it again-good mounting technique is far less risky than a brutal stretching session (it’s your money). Once you get the tire on, inflate it and leave it on the rim to keep it stretched.
Gluing the rim surface
Starting with a new rim requires that you clean the surface. In most cases, a detergent like Simple Green will be enough to clean any dirt or oily residue from the tire interface. Lacquer thinner or MEK (methyl ethyl keytone) on a towel will also do a great job in a well-ventilated area.

A little glue is better than a lot. You’ll be applying two coats.
When the rim is clean and dry, put it in a wheel-stand or similar device so you can paint the glue onto the rim without courting disaster. Open a tube of glue and apply a thin line between spoke holes around the circumference of the rim.

Quickly use a flux brush to spread a thin coat of glue from edge to edge, taking care not to glob glue into the spoke holes. Place the flux brush into a half-inch of thinner in your sealed container and wait until the glue dries tacky to the touch. Repeat the process once more, so the rim has two coats.
Tip: If your rim already has glue on it, use a clean towel and thinner to remove dirt and deposits from the glue surface, and apply two new coats of glue over the existing residue.
Time to glue the tire
Pull the tire off your storage rim and lay it on your clean workbench. Inflate it to 100 psi and, in most cases, the tire will turn inside out, exposing the base tape. Carefully paint the base tape with glue, taking care to get the glue impregnated into the cloth’s textured surface. Let it dry tacky to the touch and repeat for a second coat.

Brush glue the full width of the base tape. Paint over residual glue of a used tire.
When you have applied glue to both wheels and tires, let them hang to dry completely in a clean, dry place for an hour or two (if you are using another type of glue than Continental, you may have to let the tires sit for up to five hours until the glue sets up completely-check the maker’s instructions).
The moment of truth: mounting the tire to the rim
Hopefully you have honed your tubular mounting technique with a few trial runs on unglued rims, because now is not the time to make a sophomoric mistake. Put the wheel in a wheel truing stand and add one more thin, even layer of glue (leave the tire alone). When it is tacky to the touch (30 minutes to an hour), swing the wheel between your feet on a clean, dry surface, like a linoleum floor, valve-hole up.

Stretch the tire over the rim well as you slide your hands firmly downward.
Deflate the tire and slip the valve into the rim, grab the outside of the tire to the right and left of the valve hole and-smoothly, with great conviction, slide the tire onto the rim.
Bear down with your weight. Trap the tire with your thumbs as you reach the floor.
Use your weight and work continuously, exerting downward pressure until the tire is almost there. Catch it with your thumbs and slip the remaining section over the rim inch by inch.

Flip the tubular in place with alternating thumb pressure.
If it appears like you haven’t stretched the tire enough and you won’t make it, lift the tire off of the tacky rim and try again. Yes, you will have glue on your hands and arms. Yes, your expensive tubular will have stains on its sidewalls-but you are almost there!
Centering the tubular
While the tire is still deflated, wiggle it around so that the base tape is showing evenly around both sides of the rim.

After installing the tubular, the base tape reveal should be the same around the whole rim.
Check that the valve stem is pointing straight and then inflate the tire close to its recommended pressure. This will be your last chance to straighten the tire on the rim while the glue is not completely set up.

Make adjustments to center the tire while the glue is still tacky.
Spin the wheel in a truing stand (or the bicycle frame) and use two hands to wiggle the tire into position until the base tape is showing evenly around the rim.
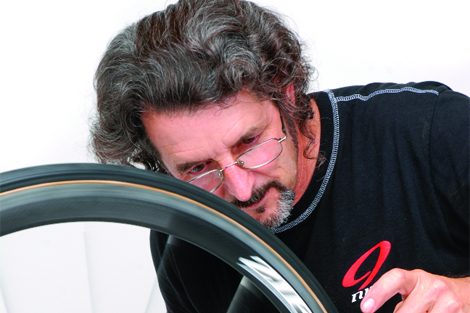
Spin the wheel to check for tire misalignment. A slight wiggle in the tread (one millimeter) is normal.
Look for wiggles in the tread; if they are bad, and the base tape is even, then split the difference. It is important to know that a little tread wiggle will not affect the performance of a tubular tire in the slightest.
Patience, my friends
Once mounted successfully, use thinner and a towel to remove any glue residue from the rim, taking care not to touch the tire. Your braking is dependent upon a clean rim, so take your time and get it right. Inflate the tire to the maximum recommended pressure and leave the wheels hanging in a clean, dry place. preferably at room temperature for at least eight hours (overnight) before you ride them. This insures that the glue is dry. Before you ride, grab the tire and try to roll it off the rim with a moderate amount of force. The glue should hold, and stretch slightly at the edge of the base tape. A this point, you can ride as hard as you want-and corner with the conviction of a seasoned ProTour racer.
And what if I get a puncture?
Remember that third tubular I said you must have? Well, it’s your spare. Because the tube is sewn inside the tubular tire and then sealed by the base tape, repairing a puncture is time-consuming. Instead, tubular riders use a vintage toe-clip strap to secure a spare tire under their saddles and simply replace the tire in the event of a puncture. Your spare tire should be a used tire with lots of glue residue on its base tape, or a new tire with two coats of glue already applied. This is important, because you will not be able to re-glue the spare tire to the rim. The residual glue on the tire and rim will reform a partial bond that will be about half-strength ? enough to get you home if you ride with a degree of restraint. To replace a tire, take the wheel off of the bike and use the concentrated force of both thumbs to peel a section of tire off of the rim. Tubular glue stays tacky, so although the first part of the tire will take some effort to break free, once you have a few inches rolled over the edge of the rim, the rest of the tire will peel right off. Take care not to separate the base tape from the tire-if that begins to occur, move to another part of the wheel and start again.
Note: It is possible to repair a tubular tire on the road, but it’s a two-hour job for a novice, and it takes a knife, needle and thread, a patch kit, latex glue and some luck.
And, the Stan’s Secret
Many tubular tires have removable valve stems-and this gives a tubular rider a distinct advantage. For puncture protection on long rides, or to seal a tubular that has been punctured, remove the valve stem and fill the tube with one ounce of Stan’s NoTubes latex-based sealant. Replace the valve stem, inflate the tire and swish the fluid around the inside of the tire. Sealant will add a few grams, but the self-sealing action of the fluid will resurrect a spent tubular and give a large dose of invincibility.
What could go wrong?
There are many more stories about cyclists rolling tubular tires off of rims than there are actual events, but it is still a remote possibility. ‘Rolling’ a tire refers to a tubular that comes unglued (usually because it was a spare, or never glued well in the first place), and rolls off the edge of the rim in a corner-or during a crash when the front wheel is turned 90-degreed to the direction of travel. That said, inflating a tubular tire will cinch it down on the rim firmly-without any glue at all. In fact, one of the main reasons that pros ride tubulars is that they stay on the rim after the tire is punctured and can be ridden for miles completely flat. Clinchers can’t offer this extra margin of safety, because even if the tire does not leave the rim (which is almost a given), the bicycle still slides to the ground on the slippery metal or carbon clincher-rim flanges.
Comments are closed.